True Colors: Creating Natural Food Dyes at Home
In food as in nature, color abounds. Natural dyes, made from food scraps that would otherwise go composted or unused, suddenly inspire creative opportunities that reduce food waste. They can replace synthetic chemical colorings in foods like frostings, icings and batters. They can also dye fiber such as yarn, clothing and pillowcases. And they can add color to DIYs and projects from paper crafts to homemade paints to Easter eggs.
Creating natural food dyes rests on a willingness to experiment with ingredients to see what colors emerge. Here are some common food scraps and the colors they evoke. Ultimately, experimentation is key for anyone who wants to learn to create natural dyes at home.
NATURAL FOOD DYES 101
These are the general steps for creating natural food dyes from food scraps. Refer to our recommended resources below for more in-depth steps and safety tips.
- Gather at least one cup of leftover fruit and vegetable bits. Chop the fruits and veggies to allow more color to saturate the dye.
- Add the chopped food scraps to a saucepan and cover with twice as much water as the food quantity. For one cup of scraps, use two cups of water.
- Bring the water to a boil. Reduce heat and simmer for approximately one hour, or until the dye reaches the desired color.
- Turn off heat and let the water come to room temperature.
- Strain the cooled dye into a container.
HOW TO DYE FABRICS
Natural food dyes can create lovely one-of-a-kind shades for clothing, fabric and yarn, but natural fibers require an extra step of preparation to hold natural dye. Fabrics require the use of a fixative, also called a mordant, to adhere the colors to the clothing. Here’s how to create long-lasting colored fabrics (see below for safety tips).
For fruit dyes, simmer fabric in ¼ cup salt and 4 cups water for approximately one hour.
For vegetable dyes, simmer fabric in 1 cup vinegar and 4 cups water for approximately one hour.
After the hour, carefully rinse the fabric in cold water. Gently wring excess water from fabric. Immediately soak fabric in the natural dye until it reaches the desired color. Place the dyed fabric in a container overnight or up to 24 hours. The next day, rinse the fabric under cool water until the water runs clear. Hang to air dry. To further set the dye, run the fabric through a dryer by itself.
SAFETY WITH DYES
Even though a fixative, or mordant, is necessary for dyeing fabric, some fixatives are dangerous to use. Chemical mordants such as iron, copper and tin, which have fixative properties, are toxic and harsh chemicals. That’s why this article recommends the use of salt as a natural fixative.
Regardless of the fixatives and natural products you use, make sure to use separate pots, containers and utensils for your dye projects. Use these tools only for dyeing and not for cooking or eating.
When you dye fabric, remember to wear rubber gloves or you might end up with stained hands.
Lastly, choose an environment in which to dye that offers good ventilation where you can store your equipment and extra dye away from the home environment, like that shed out back or your garage. Bathrooms and kitchens are not recommended.
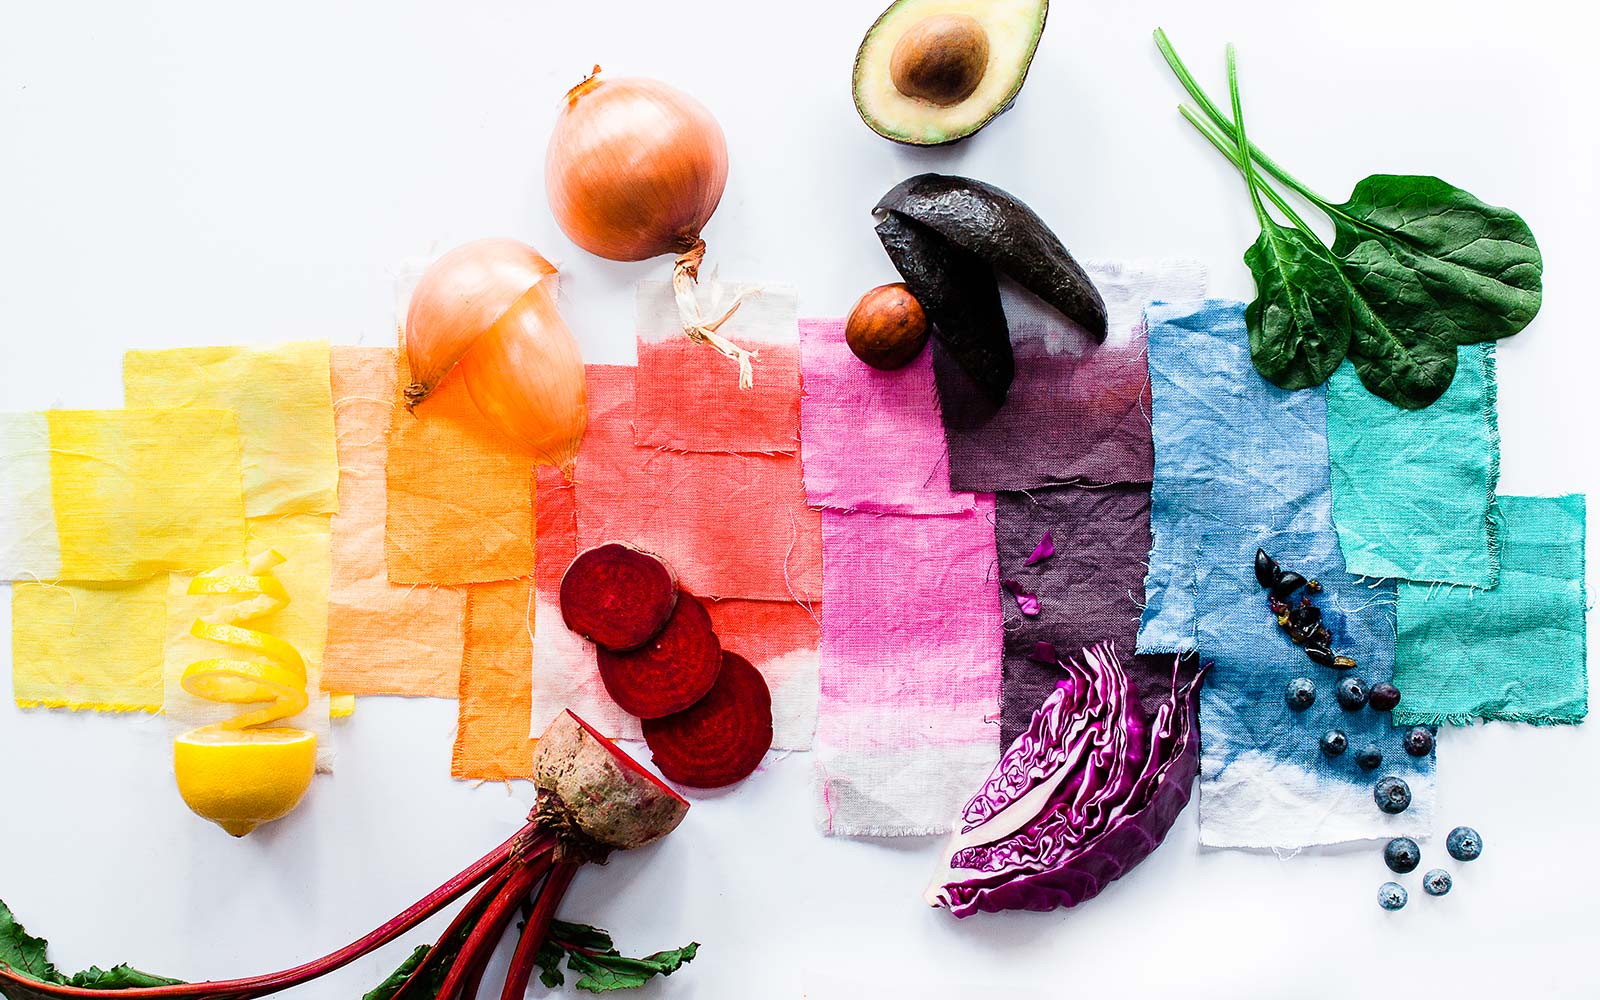
BEETS
Save beet trimmings, peelings and tops to produce a rich reddish-pink dye. The color produced from beets often fades over time in fabrics but serves well in short-term uses such as coloring Easter eggs, frostings or batters.
AVOCADOS
Instead of tossing out avocado skins and seeds, store them in the freezer. Five or six avocados will create enough dye for smaller projects, but more scraps will encourage deeper color tones. Boiling the avocado skins and seeds draws out colors from warm peach to light pink.
ONIONS
Onion skins contain their own tannins, so no fixative is required to dye fabric. There’s no need to treat the fabric ahead of time. Yellow onion skins produce a yellow-orange color, while red onion skins produce a pale orange with pink undertones.
LEMONS
Chopped lemon peels produce a soft lemonade-yellow color. When using natural dyes to color frostings or icings, add the dye little by little to achieve the desired shade. A small amount of flavor often remains from the original food, so taste as you go.
SPINACH
Wilted spinach can span a range of shades from deep green to soft celery. Increasing the amount of spinach deepens the color. Natural ingredients from artichokes to herb leaves to grass can create green tones. To create your own natural green dye, experiment with different combinations.
BLUEBERRIES
If you’ve picked more blueberries than you can eat, they can make a light blue dye or a purplish dye depending on the concentration of fruit. Experimentation is key.
RED CABBAGE
When boiled into dye, red cabbage leaves create a deep purple shade. Dye made from red cabbage leaves is generally difficult to fix to fabric, but the fixative will help for short-term projects. This dye is ideal for coloring frostings or batters.
Resources
Hungry for more? Check out these recommended resources to learn more about natural food dyes.
Botanical Colour at Your Fingertips
by Rebecca Desnos
Natural Color: Vibrant Plant Dye Projects for Your Home and Wardrobe
by Sasha Duerr
Harvesting Color: How To Find Plants and Make Natural Dyes
by Rebecca Burgess
The Modern Natural Dyer: A Comprehensive Guide to Dyeing Silk, Wool, Linen, and Cotton at Home
by Kristine Vejar
The Art and Science of Natural Dyes: Principles, Experiments, and Results
by Joy Boutrup & Catharine Ellis